Securing Privileged Access with Azure AD (Part 1) – Strategy and Planning

I’ve been approached a few times recently on how best to govern and secure Privileged Access using the Microsoft stack. Often this conversation is with organizations who don’t have the need, budget or skillset to deploy a dedicated solution such as those from CyberArk, BeyondTrust or Thycotic. Understanding this, these organizations are looking to uplift security, but are pragmatic about doing it within the ecosystem they know and can manage. This series will focus on getting the most of out Azure AD, challenging your thinking on Azure AD capabilities and using the Microsoft ecosystem to extend into hybrid environments!

What is Privileged Access?

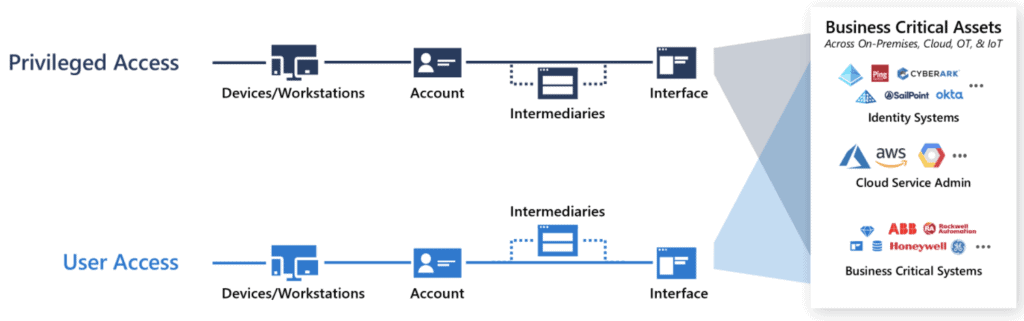
Before we dive too deep into the topic, it’s important to understand what exactly is privileged access? Personally, I believe that a lot of organizations look at this in the wrong light. The simplest way to expand your understanding is by asking two questions.

  1. If someone unauthorized to see or use my solution/data had the ability to do so, would the impact to my business be negative?
  2. If the above occurred, how bad would it be?

The first question really focuses on the core of privileged access – It is a special right you grant your employees and partners, with the implicit trust it won’t be abused in a negative way. Using this question is good because it doesn’t just focus on administrative access – A pitfall which many organizations fall into. It also brings specialized access into scope. Question two is all about prioritizing the risk associated with each of your solutions – Understanding that intentional leakage of the organizational crown jewels is more important than someone who can access a server will often allow you to be pragmatic with your focus in the early stages of your journey.

Access diagram showing the split between privileged and user access.
This Microsoft visual shows how user access & privileged access often overlap.

Building a Strategy

Understanding your strategy for securing privileged access is a critical task and it should most definitely be distinct from any planning activities. Privileged access strategy is all about defining where to exert your effort over the course of your program. Having a short term work effort, aligned to a long term light on the hill ensures that your PAM project doesn’t revisit covered ground.

To do this well, start by building an understanding of where your capabilities exist. Something as simple as location is adequate. For example, I might begin with; Azure Melbourne, Azure Sydney, Canberra datacenter and Unknown (SaaS & everything else).

From that initial understanding, you can begin to build out some detail, aligned to services or data. If you have a CASB service like Cloud App Security enabled, this can be really good tool to gain insights on what is used within in your environment. Following this approach, our location based data suddenly expands to; Azure IaaS/PaaS resources, Azure Control Plane, SaaS application X, Data Platform (Storage Accounts) and Palo Alto Firewalls.

This list of services & data can then be used to build a list of access which users have against each service. For IaaS/PaaS and SaaS app X, we have standard users and administrators. ARM and Data platform overlaps for admin access, but data platform also has user access. Our networking admins have access to the Palo Alto devices, but this service is transparent to our users.

Finally, build a matrix of impact, using risks to the identity & likelihood of occurrence. Use this data to prioritize where you will exert your effort. For example; A breach of my SaaS administrator account for a region isn’t too dangerous, because I’ve applied a zero trust network architecture. You cannot access customer data or another region from the service in question. I’ll move that access down in my strategy. My users with access to extremely business sensitive data commonly click phishing emails. I’ll move that access up in my strategy.

How to gauge impact easily – Which version of the CEO would you be seeing, if this control of this privileged access was lost?
Source: Twitter

This exercise is really important, because we have begun to build our understanding of where the value is. Based on this, a short PAM strategy could be summarized into something like so;

  1. Apply standard controls for all privileged users, decreasing the risk of account breach.
  2. Manage administrative Accounts controlling identity, ensuring that access is appropriate, time bound and audited.
  3. Manage user accounts with access to key data, ensuring that key access is appropriate, reviewed regularly and monitored for misuse.
  4. Manage administrative Accounts controlling infrastructure with key data.
  5. Apply advanced controls to all privileged users, enhancing the business process aligned to this access.
  6. Manage administrative accounts with access to isolated company data (no access from service to services).

My overarching light on the hill for all of this could be summarized as: “Secure my assets, with a focus on business critical data enhancing the security of ALL assets in my organization”

Planning your Solutions

After you have developed your strategy, it’s important to build a plan on how to implement each strategic goal. This is really focused on each building block you want to apply and the technology choices you are going to make. Notice how the above strategy did not focus on how we were going to achieve each item. My favourite bit about this process is; Everything overlaps! Developing good controls in one area, will help secure another area, because identity controls generally cover all the user base!

The easiest way to plan solutions is to build out a controls matrix for each strategic goal. As an example,

Apply Standard Controls for all privileged users

Could very quickly be mapped out to the following basic controls:

Solution ControlPurpose
Conditional AccessMulti-Factor AuthenticationWorks to prevent password spray, brute force and phishing attacks. High quality MFA design combined with attentive users can prevent 99.9% of identity based attacks.
Conditional AccessSign In Geo BlockingAdministration should be completed only from our home country. Force this behaviour by blocking access from other locations.
Azure AD Password ProtectionPassword PolicyWhile we hope that our administrators don’t use Summer2021 as a password, We can sleep easy knowing this will be prevented by a technical control.

These control mappings can be as complex or as simple as needed. As a general recommendation, starting small will allow you to aggressively achieve high coverage early. From there you can re-cover the same area with deeper and advanced controls over time. Rinse and repeat this process for each of your strategic goals. You should quickly find that you have a solution for the entire strategy you developed!

Up Next

If you’ve stuck with me for this long, thank-you! Securing Privileged Access really is a critical process for any cyber security program . Hopefully you’re beginning to see some value in really expanding out a strategy and planning phase for your next privileged access management project. Over the next few posts, I’ll elaborate on what can be done using Azure AD, and some tips and techniques to help you stay in control. Topics we will cover are:

  1. Strategy & Planning (This Post)
  2. Azure AD Basics
  3. Hybrid Scenarios
  4. Zero Trust
  5. Protecting Identity
  6. Staying in Control

Until next time, stay cloudy!

Originally Posted on arinco.com.au

Security Testing your ARM Templates

In medicine there is a saying “an ounce of prevention is worth a pound of cure”” – What this concept boils down to for health practitioners is that engaging early is often the cheapest & simplest method for preventing expensive & risky health scenarios. It’s a lot cheaper & easier to teach school children about healthy foods & exercise than to complete a heart bypass operation once someone has neglected their health. Importantly, this concept extends to multiple fields, with CyberSecurity being no different.
Since the beginning of cloud, organisations everywhere have seen explosive growth in infrastructure provisioned into Azure, AWS and GCP. This explosive growth all too often corresponds with increases to security workload without required budgetary & operational capability increases. In the quest to increase security efficiency and reduce workload, this is a critical challenge. Once a security issue hits your CSPM, Azure Security Centre or AWS Trusted Inspector dashboard, it’s often too late; The security team now has to work to complete within a production environment. Infrastructure as Code security testing is a simple addition to any pipeline which will reduce the security group workload!

Preventing this type of incident is exactly why we should complete BASIC security testing..

We’ve already covered quality testing within a previous post, so today we are going to focus on the security specific options.

The first integrated option for ARM templates is easily the Azure Secure DevOps kit (AzSK for short). The AzSK has been around for while and is published by the Microsoft Core Services and Engineering division; It provides governance, security IntelliSense & ARM template validation capability, for free. Integrating to your DevOps Pipelines is relatively simple, with pre-built connectors available for Azure DevOps and a PowerShell module for local users to test with.

Another great option for security testing is Checkov from bridgecrew. I really like this tool because it provides over 400 tests spanning AWS, GCP, Azure and Kubernetes. The biggest drawback I have found is the export configuration – Checkov exports JUnit test results, however if nothing is applicable for a specified template, no tests will be displayed. This isn’t a huge deal, but can be annoying if you prefer to see consistent tests across all infrastructure…

The following snippet is all you really need if you want to import Checkov into an Azure DevOps pipeline & start publishing results!

  - task: UsePythonVersion@0
    inputs:
      versionSpec: '3.7'
      addToPath: true
    displayName: 'Install Python 3.7'
  
  - script: python -m pip install --upgrade pip setuptools wheel
    displayName: 'Install pip3'

  - script: pip3 install checkov
    displayName: 'Install Checkov using pip3'

  - script: checkov -d ./${{parameters.iacFolder}} -o junitxml -s >> checkov_sectests.xml
    displayName: 'Security test with Checkov'

  - task: PublishTestResults@2
    displayName: Publish Security Test Results (Checkov)
    condition: always()
    inputs:
      testResultsFormat: JUnit
      testResultsFiles: '**sectests.xml'

When to break the build & how to engage..

Depending on your background, breaking the build can really seem like a negative thing. After all, you want to prevent these issues getting into production, but you don’t want to be a jerk. My position on this is that security practitioners should NOT break the build for cloud infrastructure testing within dev, test and staging. (I can already hear the people who work in regulated environments squirming at this – but trust me, you CAN do this). While integration of tools like this is definitely an easy way to prevent vulnerabilities or misconfigurations from reaching these environments, the goal is to raise awareness & not increase negative perceptions.

Security should never be the first team to say no in pre-prod environments.

Use the results of any tools added into a pipeline as a chance to really evangelize security within your business. Yelling something like “Exposing your AKS Cluster publicly is not allowed” is all well and good, but explaining why public clusters increase organisational risk is a much better strategy. The challenge when security becomes a blocker is that security will no longer be engaged. Who wants to deal with the guy who always says no? An engaged security team has so much more opportunity to educate, influence and effect positive security change.

Don’t be this guy.

Importantly, engaging well within dev/test/sit and not being that jerk who says no, grants you a magical superpower – When you do say no, people listen. When warranted, go ahead and break the build – That CVSS 10.0 vulnerability definitely isn’t making it into prod. Even better, that vuln doesn’t make it to prod WITH support of your development & operational groups!

Hopefully this post has given you some food for thought on security testing, until next time, stay cloudy!

Note: Forest Brazael really has become my favourite tech related comic dude. Check his stuff out here & here.

AWS GuardDuty: What you need to know

One of the most common recurring questions asked by customers across all business sectors is: How do I monitor security in the cloud?

While extremely important to have good governance, design and security practice in place when moving the cloud, it’s also extremely important to have tools in place for detecting when something has gone wrong.

For AWS customers, this is where GuardDuty comes in.

A managed threat detection service, GuardDuty utilities the size and breadth of AWS to detect malicious activity within your network. It’s a fairly simple concept, with huge benefits. As a business, you have visibility to your assets & services. As a provider, Amazon has visibility of network services along with visibility of ALL customers networks.

Using this, Amazon has been able to analyse, predict and prevent huge amounts of  malicious cyber activity. It’s hard to see the forest from the trees, and GuardDuty is your satellite – provided all thanks to AWS.

product-page-diagram-Amazon-GuardDuty_how-it-works.4370200b49eddc34d3a55c52c584484ceb2d532b

In this blog, we’ll cover why AWS GuardDuty is great for cloud security on AWS deployments, its costs and benefits, and key considerations your business needs to evaluate before adopting the service.

Why is security monitoring & alerting important?

Once a malicious actor penetrates your network, time is key.

Microsoft’s incident response team has the “Minutes Matter” motto for a reason.  In 2018, the average dwell time for Asia Pacific was 204 days (FireEye). That’s over half of a year where your data can be stolen, modified or destroyed.

Accenture recently estimated the average breach costs a company 13 million dollars. That’s an increase of 12% since 2017, and a 72% increase on figures from 5 years ago.

As a business, it’s extremely important to have a robust detection and response strategy. Minimising dwell time is critical and enabling your IT teams with the correct tooling to remove these threats can reduce your risk profile.

The result of your hard efforts? Potential savings of huge sums of money.

AWS GuardDuty helps your teams by offloading the majority of the heavy lifting to Amazon. While it’s not a silver bullet, removal of monotonous tasks like comparing logs to threat feeds is an easy way to free up your team’s time.

What does GuardDuty look like?

For those of you who are technically inclined, Amazon provides some really great tutorials for trying out GuardDuty in your environment and we’ll be using this one for demonstration purposes. 

GuardDuty’s main area of focus is the findings panel. Hopefully this area remains empty with no alerts or warnings. In a nightmare scenario, it could look like this:

Capture-5

Thankfully, this panel is just a demo and you can see a couple of useful features that are designed to help your security teams respond effectively.  On the left, you will notice a coloured icon, denoting the severity of each incident – Red Triangle for critical issues, orange squares for warnings and blue circles for information. Under findings, you will find a quick summary on the issue – We’re going to select one and hopefully dig into the result. 

As you can see, a wealth of data is presented when you navigate into the threat itself. You can quickly see details of the event, in this case Command & Control activity, understand exactly what is affected and then navigate directly to the affected instance. Depending on the finding & your configuration,  GuardDuty may have even automatically completed an action to resolve this issue for you.

AWS GuardDuty: What are the costs?

AWS GuardDuty is fairly cheap due to the fact it relies on on existing services within the AWS ecosystem.

First cab off the rank is CloudTrail, the consolidated log management solution for AWS. Amazon themselves advise that CloudTrail will set you back approximately:

  • $8 for 2.15 MILLION events
  • $5 for the log ingestion
  • Around $3 for the S3 storage.
  • Required VPC flow logs will then set you back 50¢ per GB. 

Finally AWS Guardduty service itself costs $4 dollars for a million events.

Working on the basis that we generate about two million events a month, we end up paying only $16 dollars (AUD)

Pretty cheap, if you ask us.

AWS GuardDuty: Key business considerations

GuardDuty is great, but you need to make sure you’re aware of a couple of things before you enable it:

It’s a regional service. If you’re operating in multiple regions you need to enable it for each, and remember that alerts will only show in those regions. Alternately, you can ship your logs to a central account or region and use a single instance. 

It’s not a silver bullet. While some activity will be automatically blocked, you do need to check in on the panel and act on each issue. While the machine learning (ML) capability of AWS GuardDuty is great, sometimes it will get it wrong and human (manual) intervention is needed. AWS GuardDuty doesn’t analyse historical data. Analysis is completed on the fly, so make sure to enable it sooner rather than later. 

Can you extend AWS GuardDuty?

Extending GuardDuty is a pretty broad topic, so I’ll give you the short answer: Yes, you can.

If you’re interested there’s a wealth of information available at the following locations:

Hopefully by now you’re eager to give GuardDuty a go within your own environment! It’s definitely a valuable tool for any IT administrator or security team. As always, feel free to reach out to myself or the Xello team should you have any questions about staying secure within your cloud environment.

Originally Posted on xello.com.au

Azure Sentinel Preview Impressions – A cloud-native SIEM with teeth

After setting up Windows Virtual Desktop last week, I thought I would continue the preview theme of my blog. Prior to RSA San Francisco, Microsoft announced Azure Sentinel: A cloud first Security information and event management (SIEM) tool built on top of Azure Log Analytics, Logic Apps & Jupyter notebooks.

As a huge security geek, Microsoft’s gradual push into the security space is something I will always welcome and I’m really excited to see some competition to Splunk’s IT Service Intelligence & AWS Guard duty. The intent from Microsoft is to provide super cool automated threat detection features, while also providing detailed analysis and incident response capability to security operations center (SOC) engineers!

The other side effect of using AI/ML is the reduced alert fatigue. Open any badly tuned SIEM (even some well-tuned ones) and you will quickly realise how many logs a fully operational environment generates. With new cloud services doing a bunch of heavy lifting, SOC engineers can focus on what matters: Responding and investigating. 

Thankfully, deployment for Azure Sentinel is extremely simple – even faster if you’re already using Azure Security Center. Let’s get stuck in!

Azure Sentinel – What you need before you begin

Before you start you will need the following:

  • An active Azure Subscription
  • A couple of pre-configured virtual machines
  • An East US log analytics workspace. Sentinel is East US only while in public preview, but expect this to change as the product nears release date.

To get some useful data in quickly, I’ve already configured Azure Security Center and forced server enrolment. If you’re not using Security Center, it is the best way to get excellent insight into your Azure security standing. The added bonus is on-boarding Sentinel is much easier!

azure_sentinel_walkthrough_screenshot_1

If you need to enable automatic provisioning, you can turn this on with a standard Security Center plan ($15/node). The settings are available from: Security Center > Security Policy > Subscription Settings > Data Collection.

Azure Sentinel – Step #1: Activating Sentinel

Enabling Azure Sentinel is extremely easy – almost too simple for a blog post.

Search for Sentinel in the focus bar on the top of your Azure Portal and select the option with the blue shield. This will take you to Azure Sentinel workspaces, where you can view the sentinel environments already configured.

Rather than utilising one Azure Sentinel instance for a complete subscription, Microsoft has accounted for multiple log analytics workspaces. I think this a really neat method for providing isolation boundaries for different areas of your environment.

azure_sentinel_walkthrough_screenshot_2

Once you’re at this page, click the Connect Workspace button glaring at you and select your pre-configured workspace when prompted.

azure_sentinel_walkthrough_screenshot_3.jpg

Azure Sentinel – Step #2: Setting up connectors

If you managed to complete the worlds easiest activation, you should be faced with the following welcome screen, and Sentinel is now active in your environment. You still need to onboard services and enable functionality, so stick with me for a bit longer.

azure_sentinel_walkthrough_screenshot_4

Select ‘data connectors’ on the right-hand side and be blown away by all the available choices. For this blog, I’ll be onboarding my Azure Security Center, Security Events and Azure Activity. This should give us an initial footprint to see some functionality. In a production configuration, I would hopefully configure the first 9 options at a minimum. Obviously, this is dependent on what services you are utilising.

azure_sentinel_walkthrough_screenshot_5

The Security Center enablement is quite simple. From here, select the menu clicker and enable a Sentinel connection for each subscription you have onboarded – you’re a good azure admin, so that’s all of them.

azure_sentinel_walkthrough_screenshot_6

Remember when I said that using Security Centre makes Sentinel easier? As you can see here, I’ve enabled all events for Security Center and Sentinel has automatically detected this. If you haven’t used Security Center, pick the desired level of logs you want, and select ‘Ok’.

azure_sentinel_walkthrough_screenshot_7

Finally, I’m going to onboard Azure Activity logs. This will give us visibility of what is happening at the platform level, and allow us to hunt for suspicious deployments, privilege escalation or undesired configuration change! Of the three services I have onboarded, this one is the most complex, requiring a grand total of 4 clicks. Quite exhausting, isn’t it?

azure_sentinel_walkthrough_screenshot_8
azure_sentinel_walkthrough_screenshot_9
azure_sentinel_walkthrough_screenshot_10

At this point, I would recommend shutting down your computer and taking a walk to your nearest pub for a well-earned Furphy.

Sentinel takes a little bit of time to start seeing logs, and a bit longer to gain some actionable log data.

Like a well-seasoned TV chef, here’s a snapshot I created earlier.

azure_sentinel_walkthrough_screenshot_11

Azure Sentinel – Step #3: Activating Machine Learning

You now have a functioning SIEM and can begin to analyse and respond to events within your environment. Congratulations!

From here, it’s time to leverage one of the largest selling points of Azure Sentinel – it’s machine learning (ML) capability, titled Fusion.

Intended to reduce alert fatigue and increase productivity, Sentinel Fusion is one of the many cloud products now utilising machine learning. Unfortunately, this isn’t enabled out of the box, and requires you to complete a couple commands to activate.

First, launch cloud shell within your portal.

azure_sentinel_walkthrough_screenshot_12

Next up, update the below command with your subscription ID, resource group name and workspace details and paste it to the console.

azure_sentinel_walkthrough_screenshot_13

You should receive a JSON response if the fusion activation completed successfully.

azure_sentinel_walkthrough_screenshot_14

If you’re not sure and need to validate, use the following command:

azure_sentinel_walkthrough_screenshot_15

At this point in my demo, I don’t actually have enough alerts and services to generate a Azure Sentinel Fusion alert, but if you want to learn more about using fusion, check out the official Microsoft blog post announcement here.

Azure Sentinel – Step #4: Threat Hunting and Playbooks

Now that we’ve configured Azure Sentinel and Fusion Machine Learning, I’m sure you’re excited to investigate threat hunting & automatic remediation (playbooks). Thankfully, both areas in Sentinel are built on top of existing, tried and tested platforms.

For Incident response, Sentinel utilises Azure Logic Apps. Anyone familiar with this product can testify to its versatility and Sentinel presents the complete list of Logic Apps for your subscription under the playbooks section.

azure_sentinel_walkthrough_screenshot_16

Should you wish to create a Logic App specific to Azure Sentinel, you will now notice an extra option within the triggers section.

azure_sentinel_walkthrough_screenshot_17

For hunting and investigation, Azure Sentinel provides a few great sections where SOC engineers can investigate to their hearts content.

For log analysis, Sentinel utilises the OMS workspace, built on top of KQL. Splunk engineers should find the syntax pretty easy to pick up, and Microsoft provides a cheat sheet for those making the transition.

azure_sentinel_walkthrough_screenshot_18

Engineers can utilise these queries to create custom alerts under the analytics configuration section. These alerts then generate cases when a threshold is met and will soon be able to activate a pre-configured runbook (currently a placeholder is shown in the configuration section).

If you’re new to threat hunting, SANS provides some quick reference posters like this detailed Windows one and deep dives on a multitude of security topics within its reading room! The following alert rule triggers when multiple deployments occur in the specified time-frame.

azure_sentinel_walkthrough_screenshot_19

.

My alert generates a case, which engineers can then investigate as demonstrated below.

azure_sentinel_walkthrough_screenshot_21

In-depth investigation often requires detailed and expansive notes, and this is where the final investigation tool really shines.

The last option under threat management is Notebooks, driven by the open source Jupyter project. Clicking this menu option will take you out of the standard Azure portal and into Notebooks Azure.

If I had to pick one thing I dislike about Azure Sentinel, the separate notebooks page would be it. I really hope that this can be brought into the Azure portal at some point, but I do understand the complexity of the notebook’s functionality. Here you can view existing projects, create new ones or clone them from other people.

azure_sentinel_walkthrough_screenshot_22

Covering all the functionality of Jupyter notebooks could be a blog series on its own, so head over to the open source homepage to see what it’s all about.

Azure Sentinel Impressions – The Xello Verdict

Overall, I’m really impressed with the product. While certain parts are quite clearly in preview and still require work, this is a confident first step into cloud SIEM market. If you’re evaluating early like myself, get used to seeing the following words throughout the product.

There really is a large amount of functionality in the pipeline, so Azure Sentinel only gets better from here. I’m especially excited to see the integrations with other cloud providers and have already signed up to preview the AWS guard duty integration.

If you want to dive straight into the Sentinel deep end, have a look at the GitHub page – there is a thriving community already committing a wealth of knowledge. Prebuilt notebooks, queries and playbooks should really help you adopt the product.

Originally Posted on xello.com.au