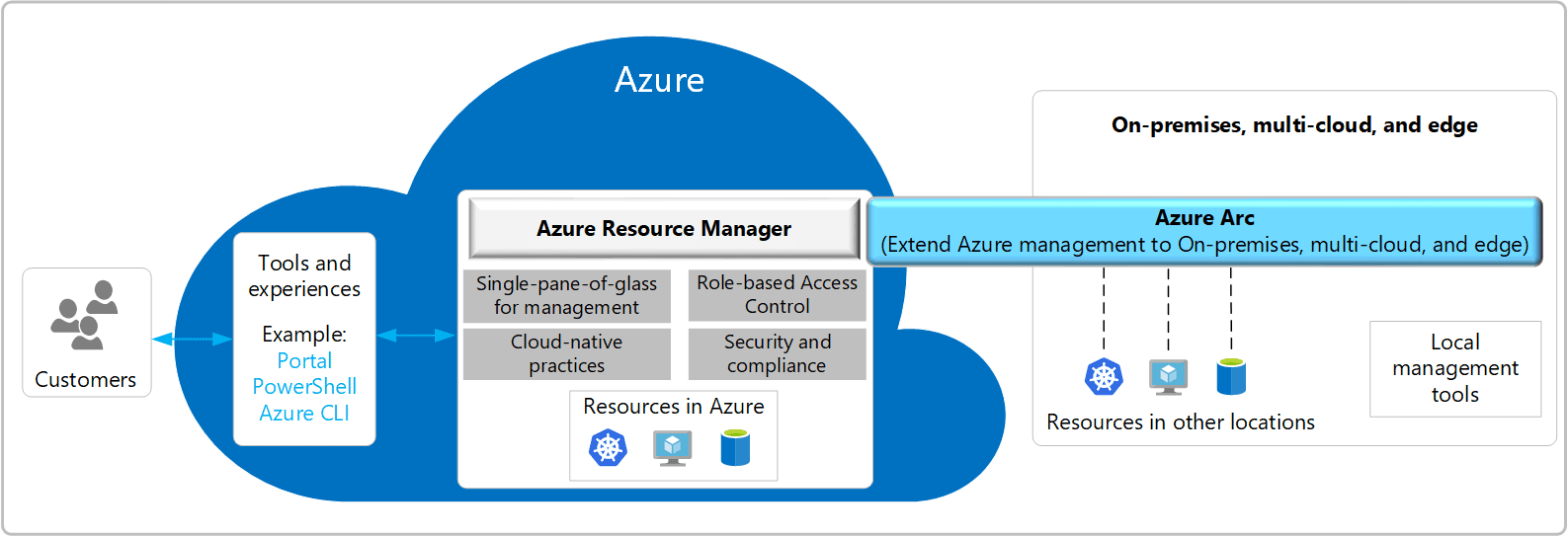
More often than not, organisations move to the cloud on a one way path. This can be a challenging process with a large amount of learning, growth and understanding required. But why does it all have to be in one direction? What about modernising by bringing the cloud to you? One of the ways that organisations can begin this process when moving to Azure is by leveraging Azure Arc, a provider agnostic toolchain that supports integration of IaaS, Data services and Kubernetes to the Azure Control Plane.

Using Arc, technology teams are enabled to use multiple powerful Azure tools in an on-premise environment. This includes;
- Azure Policy and guest extensions
- Azure Monitor
- Azure VM Extensions
- Azure Security Centre
- Azure Automation including Update Management, Change Tracking and Inventory.
Most importantly, the Arc pricing model is my favourite type of pricing model: FREE! Arc focuses on connecting to Azure and providing visibility, with some extra cost required as you consume secondary services like Azure Security Centre.
Onboarding servers to Azure Arc
Onboarding servers to Arc is a relatively straight forward task and is supported in a few different ways. If you’re working on a small number of servers, onboarding using the Azure portal is a manageable task. However, if you’re running at scale, you probably want to look at an automated deployment using tools like the VMWare CLI script or Ansible.
For the onboarding in this blog, I’m going to use the Azure Portal for my servers. First up, ensure you have registered the HybridCompute provider using Azure CLI.
az provider register --namespace 'Microsoft.HybridCompute'Next, search for Arc in the portal and select add a server. The process here is very much “follow the bouncing ball” and you shouldn’t have too many questions. Data residency is already supported for Australia East, so no concerns there for regulated entities!

When it comes to tagging of Arc servers, Microsoft suggests a few location based tags, with options to include business based also. In a lab scenario like this demo, location is pretty useless, however in real-world scenarios this can be quite useful for identifying what resources exist in each site. Post completion of tagging, you will be provided with a script for the target server. You can use generated script for multiple servers, however, you will need to update any custom tags you may add.
The script execution itself is generally a pretty quick process, with the end result being a provisioned resource in Azure and the Connected Machine Agent on your device.


So what can we do?
Now that you’ve completed onboarding you’re probably wondering what next? I’m a big fan of the Azure Monitoring platform (death to SCOM), so for me this will always be a Log Analytics onboarding task, closely followed by Security Centre. One of the key benefits with Azure Arc is the simplicity of everything, so you should find onboarding any Arc supported solution to be a straight forward process. For Log Analytics navigate to insights, select your analytics workspace, enable and you’re done!

What logs you collect is entirely on your logging collection strategy with Microsoft providing further detail on that process here. In my opinion, the performance data being located in a single location is worth it’s weight in gold.

If you have already connected Security Centre to your workspace, onboarding to Log Analytics often also connects your device to Security centre, enabling detailed monitoring and vulnerability management.

Right for you?
While the cloud enables organisations to move quickly, sometimes moving slowly is just what the doctor ordered. Azure Arc is definitely a great platform for organisations looking to begin using Azure services and most importantly, bring Azure into their data centre. If you’re wanting to learn more about Arc, Microsoft has published an excellent set of quick-starts here and the documentation is also pretty comprehensive. Stay tuned for our next post, where we explore using Azure Arc with Kubernetes. Until next time, stay cloudy!
