
Recently I built a local Kubernetes cluster – for fun and learning. As an identity geek, the first thing I assess when building any service, is “How will I log in?” Sure I can use local Kubernetes service accounts, but where is the fun in that? Getting started with my research, I found a couple of really great articles documents and I would be amiss If I didn’t start by sharing these;
- Kubernetes Authentication doc – RTFM always
- Kubernetes & Google OIDC by Benji Visser
- Kubectl with OpenID Connect by Hidetake Iwata -> Closely aligned to this post
I don’t think it needs acknowledgement, but the K8s ecosystem is diverse, and the documentation can be daunting at the best of times. This post is slightly tuned to my setup, so you may need to tinker a bit as you get things working on your own cluster. I’m using the following for those who would like to follow along at home;
- A MicroK8s based Kubernetes cluster (See here for quick setup on raspberry pi’s)
- An Okta Developer tenant (Signup here – Free for the first 5 apps)
Initial Okta Configuration
To configure this integration for any identity provider, we will need a client application; First up – create an OIDC application using the app integration wizard. You will want a “web application” with a login URL that looks something like so
https://localhost:8000
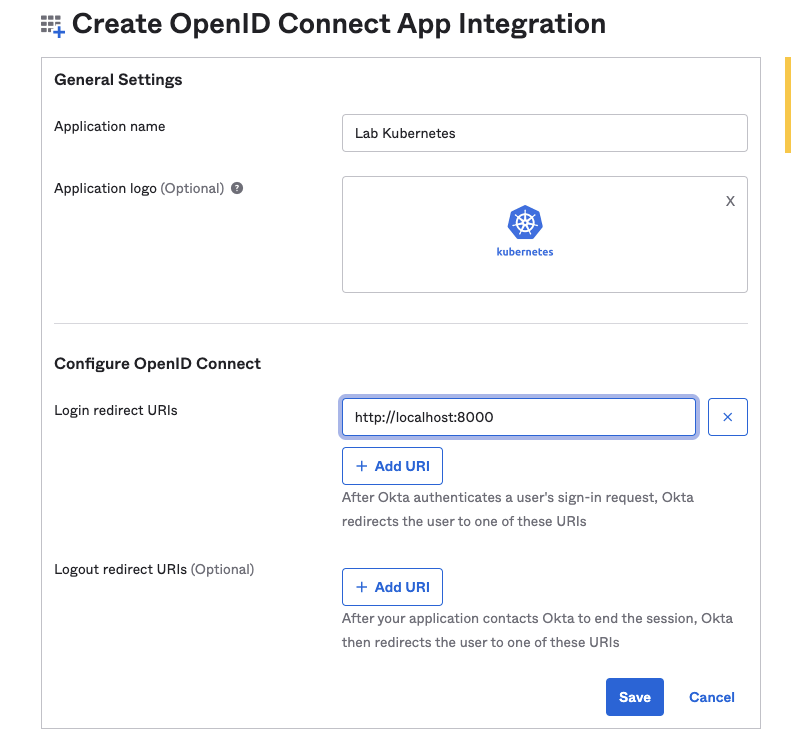
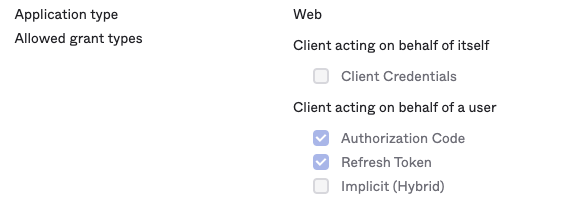
Pretty straight forward stuff, customise the name/logo as you like. Once you pass the initial screen, note down your client ID & secret for use later. Kubernetes services often are able to refresh OIDC tokens for you; to support this, you will need to modify the allowed grant types to include Refresh – A simple checkbox under the application options.
Finally, assign some users to your application. After all, it’s great to be able to login with OIDC tokens, but if Okta won’t assign them in the first place, why bother? 😀
Modifying the Kubernetes API Server
Once you’ve completed your Okta setup, it’s time to move to Kubernetes. There is a few configuration flags needed to configure the kube-apiserver, but only two are hard requirements. The others will make things easier to manage in the long run;
--oidc-issuer-url=https://dev-987710.okta.com/oauth2/default #Required
--oidc-client-id=00a1g3wxh9x9KLciv4x9 #Required
--oidc-username-prefix=oidc: #Recommended - Makes things a bit neater for RBAC
--oidc-groups-prefix=oidcgroup: #Recommended
Apply these to your api config. If you’re using kops, simply add the changes using kops edit cluster. In my case, I’m using microk8s, so I edit the apiserver configuration located at:
/var/snap/microk8s/current/args/kube-apiserver
and then apply this with:
microk8s stop; microk8s start
Testing Login
At this point we can actually test our sign-in, albeit with limited functionality. To do this, we need to grab an ID token from Okta API using curl or postman. This is a three step process.
1. Establish a session using the Sessions API
curl --location --request POST 'https://dev-987710.okta.com/api/v1/authn' \
--header 'Accept: application/json' \
--header 'Content-Type: application/json'\
--data-raw '{
"username": "kubernetesuser@westall.co",
"password": "supersecurepassword",
"options": {
"multiOptionalFactorEnroll": true,
"warnBeforePasswordExpired": true
}
}'
2. Exchange your session token for an auth code
curl --location --request GET 'https://dev-987710.okta.com/oauth2/v1/authorize?client_id=00a1g3wxh9x9KLciv4x9&response_type=code&response_mode=form_post&scope=openid%20profile%20offline_access&redirect_uri=http%3A%2F%2Flocalhost%3A8000&state=demo&nonce=b14c6ea9-4975-4dff-9cf6-1b475045dffa&sessionToken=<SESSION TOKEN FROM STEP 1>'
3. Exchange your auth code for an access & id token
curl --location --request POST 'https://dev-987710.okta.com/oauth2/v1/token' \
--header 'Accept: application/json' \
--header 'Authorization: Basic <Base64 Encoded clientId:clientSecret>=' \
--header 'Content-Type: application/x-www-form-urlencoded' \
--data-urlencode 'grant_type=authorization_code' \
--data-urlencode 'redirect_uri=http://localhost:8000' \
--data-urlencode 'code=<AUTH CODE FROM STEP 2>'
One we have collected a valid ID token, we can run any command against the kubernetes API using the –token & server flag.
kubectl get pods -A --token=<superlongJWT> --server='https://192.168.1.20:16443'
Don’t stress if you get an “Error from server (Forbidden)” prompt back from your request. Kubernetes has a deny by default RBAC design that means nothing will work until a permission is configured.

If you are like me and are also using Microk8s, you should only get this error if you have already enabled the RBAC add on. By default, Microk8s runs with the api server flag: –authorization-mode=AlwaysAllow . This means that any authenticated user should be able to run kubectl commands. If you want to enable fine grained RBAC, the command you need is:
microk8s enable rbac
Applying access control
To make our kubectl commands work, we need to apply a cluster permission. But before I dive into that, I want to point out something that is a bit yucky. Note that for each command, my user is prefixed as configured, but the identifier presented is the users unique Okta profile ID.

While this will work when I assign access, it’s definitely hard to read. To fix this, I’m going to add another flag to my kube-api config.
--oidc-username-claim=preferred_username
Now that we have applied this, you can see that I’m getting a slightly better experience – My users are actually identified by a username! It’s important for later to understand that this claim is not provided by default. In my original authorization request I ask for the “profile” scope in ADDITION to the openid scope.

From here, we can begin to apply manifests against each user for access (using an authorized account). I’ve taken the easy route and assigned a clusterAdmin role here:
kubectl apply -f - <<EOF
kind: ClusterRoleBinding
apiVersion: rbac.authorization.k8s.io/v1
metadata:
  name: oidc-admin-binding
roleRef:
  apiGroup: rbac.authorization.k8s.io
  kind: ClusterRole
  name: cluster-admin
subjects:
- kind: User
  name: oidc:Okta-Lab@westall.co
EOF
At this point you should be able to test again and get your pods with an OIDC token!

Tidying up the login flow
Now that we have a working kubectl client, I think most people would agree that 3 Curl requests and a really long kubectl command is a bit arduous. One option to simplify this process is to use the native kubectl support for oidc within your kubeconfig.
Personally, I prefer to use the kubectl extension kubelogin. The benefit of using this extension is it simplifies the login process for multiple accounts and your kubeconfig contains arguably less valuable data. To enable kubelogin, first install it;
# Homebrew (macOS and Linux)
brew install int128/kubelogin/kubelogin

# Krew (macOS, Linux, Windows and ARM)
kubectl krew install oidc-login

# Chocolatey (Windows)
choco install kubelogin
Next update your kubeconfig with an OIDC user like so. Note the use of the –oidc-extra-scope flag. Without this Okta will return a token without your preferred_username claim, and signin will fail!
- name: okta
  user:
    exec:
      apiVersion: client.authentication.k8s.io/v1beta1
      args:
      - oidc-login
      - get-token
      - --oidc-issuer-url=https://dev-987710.okta.com
      - --oidc-client-id=00a1g3wxh9x9KLciv4x9
      - --oidc-client-secret=<okta client secret>
      - --oidc-extra-scope=profile
      - -v1 #Not required, useful to see the process however
      command: kubectl
      env: null
Finally, configure a a new context with your user and run a command. Kubelogin should take care of the rest.

In my opinion, for any solution you deploy, personal or professional. Identity should always be something you properly implement. I’ve been lucky to have most of the K8s magic abstracted away from me (Thanks Azure) and I found this process immensely informative and a useful exercise. Hopefully you will find this post useful in your own identity journey 🙂 Until next time, stay cloudy!
