Securing Privileged Access with Azure AD (Part 3) – Hybrid Scenarios

While many organisations are well on the journey to exclusively operating in the cloud, the reality is that most companies operate in a hybrid state for an extended period of time. As such, we cannot always apply all of our Privileged Access effort on securing the only the cloud. In this post, I’ll walk you through three simple methods which allow you to extend Azure AD capability into an on-premise environment, with the support of key “legacy” technology. If you’re just joining us for this series, head over to part one to learn about strategy, or part two for Azure AD Basics!

1. Reducing privileged access on premise with PIM

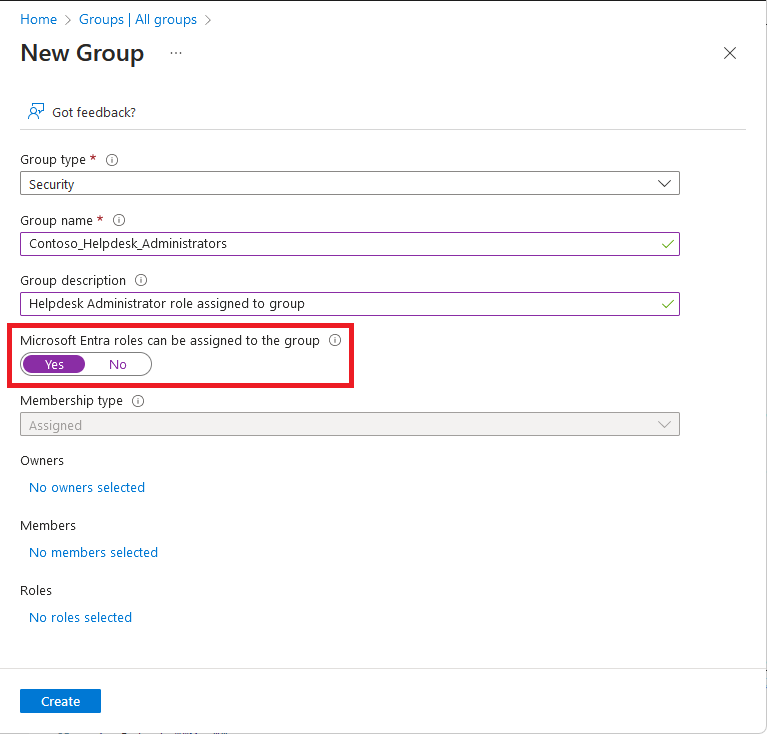
One of the challenges that many organisations perceive with PIM, is that it doesn’t extend to on-premise services. This perception is wrong – Yes, PIM itself doesn’t have native capability for on-premise, but it is extremely simple to consume PIM groups within an on premise environment. This can be done in two ways.

  1. Custom group write-back using Microsoft Identity Manager

2. Automation write-back using a script, automation account or logic-app.

Both of these options require a pragmatic approach to deployment tradeoffs. For MIM group write-back, precise time bound access doesn’t really work. MIM generally syncs on a pre defined schedule, so you would need to configure PIM lifespans to cater for this, leaving some wriggle room on either side of the PIM window. Some companies prefer not to run custom built integration, so scripts which do the sync on our own schedule are avoided.

Thankfully, the community has put some excellent effort into this space, with by far the best example of this being the goodworkaround write-back script.

Sync Privileged Access from Azure to Active Directory with custom scripts.
Visualisation of the Hybrid scenario. Source: github.com

2. Forcing MFA for administrative access using Windows Admin Center

Regardless of how you choose to manage group membership for administrative access, sometimes the simplest security control you can apply to access is the best. MFA is by far, the most effective control you can apply to admin logins.

But how to achieve this? Unfortunately, Windows Server still doesn’t include native support for Azure AD MFA inside the RDP UI (Some secondary products like Duo or Okta have solutions for this). Sure this is a bit of a bummer, but let’s be honest; Direct RDP access to a server should NOT be required in the majority of scenarios. This is for two reasons;

  • Infrastructure as Code – If you’re able to configure a server to be replaced by a pipeline, you should. Maintenance and incident remediation is a lot easier when you can simply replace the infrastructure at the click of a button, without ever logging in.
  • Remote shell – You can do pretty much anything from the command line or PowerShell these days. In my opinion, RDP by default isn’t worth the security hassle. Restrict RDP usage and move to the CLI.

If you’re not comfortable in this space, or would just like an excellent solution which lets you monitor and configure multiple servers, Microsoft provides a world class solution for remote management, Windows Admin Center (WAC). In my opinion, this is highly under-utilised and a great addition to any IT Pros toolkit.

Thankfully, Windows Admin Center has native support for Azure AD authentication. Using Conditional access, you can then apply MFA to admin access.

Managing server Privileged Access with Windows Admin Centre

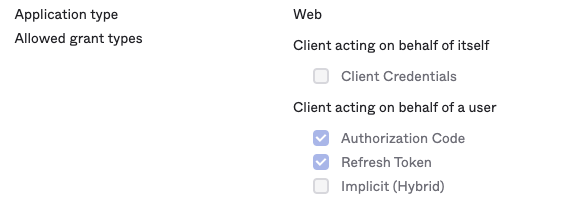
Configuring this within WAC is a straight forward task, with the settings for Azure AD Authentication available to configure under the “Settings > Access” blade:

Once enabled, you will be able to locate an Admin Center application within your Azure AD Tenant, which you can utilise to scope a targeted Conditional Access policy.


For this capability to truly be effective, you can also combine the WAC solution with an RD Gateway for RDP scenarios. Because RD Gateways operate using a Connection Authorisation Policy with NPS, you can quickly apply MFA to user sessions with the NPS extension. Be warned, this does add a small configuration overhead and occasionally a “double auth” scenario.

3. Extending Azure AD to networking infrastructure using SSO Integration or Network Policy Server

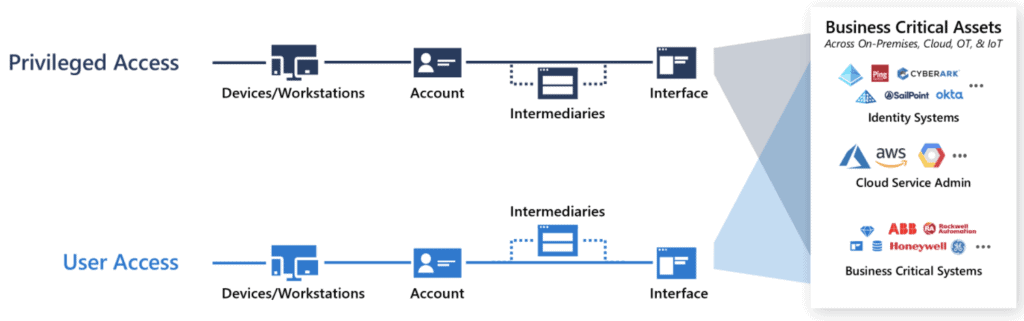
A lot of focus is generally exerted by IT teams on securing server infrastructure. But what about the network? As discussed in our strategy post, a holistic approach to privileged access includes all the solutions you manage. As the network carries all traffic for your solutions, some security practitioners will argue that securing this access is more important than securing the infrastructure!

Networking infrastructure being so diverse, you could generally enhance network privileged access security in two distinct manners.

  1. Integrate Azure AD to centralised control plane. This will require standardisation of access through a network vendor solution.
  2. Integrate networking devices to AAD via Radius. This requires support of specific radius protocols on your network devices.

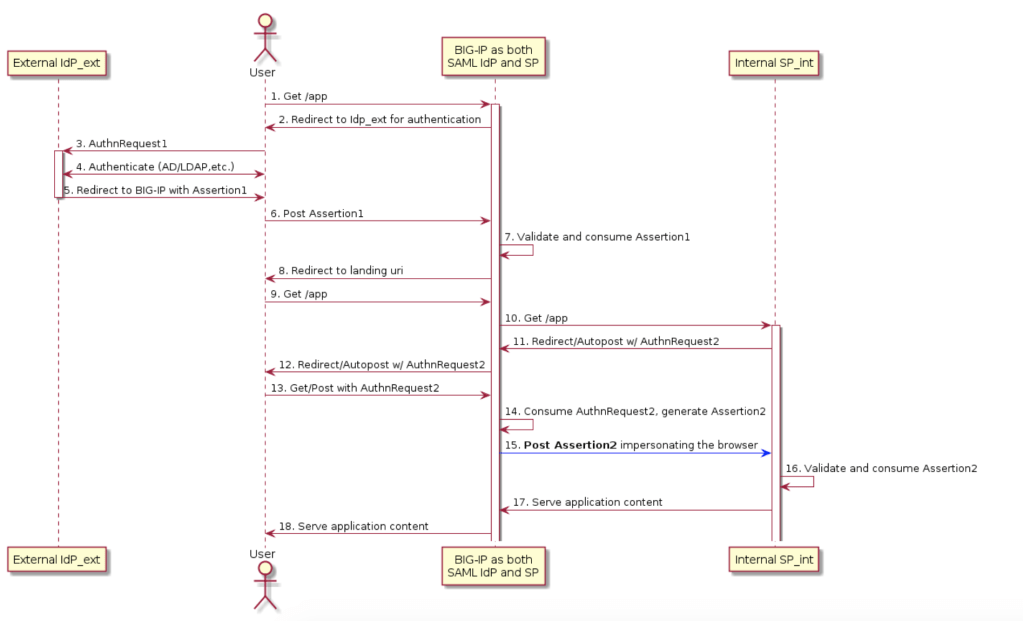
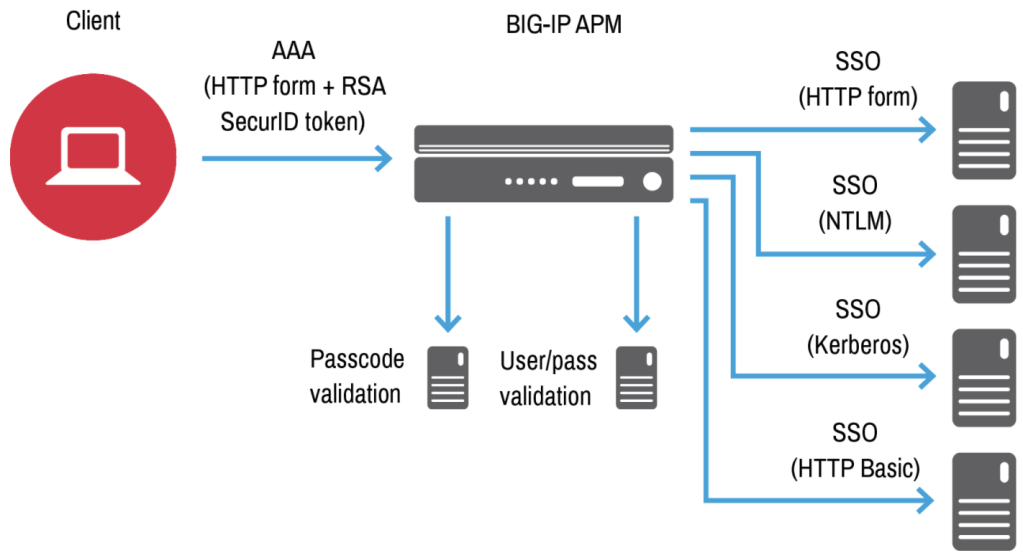
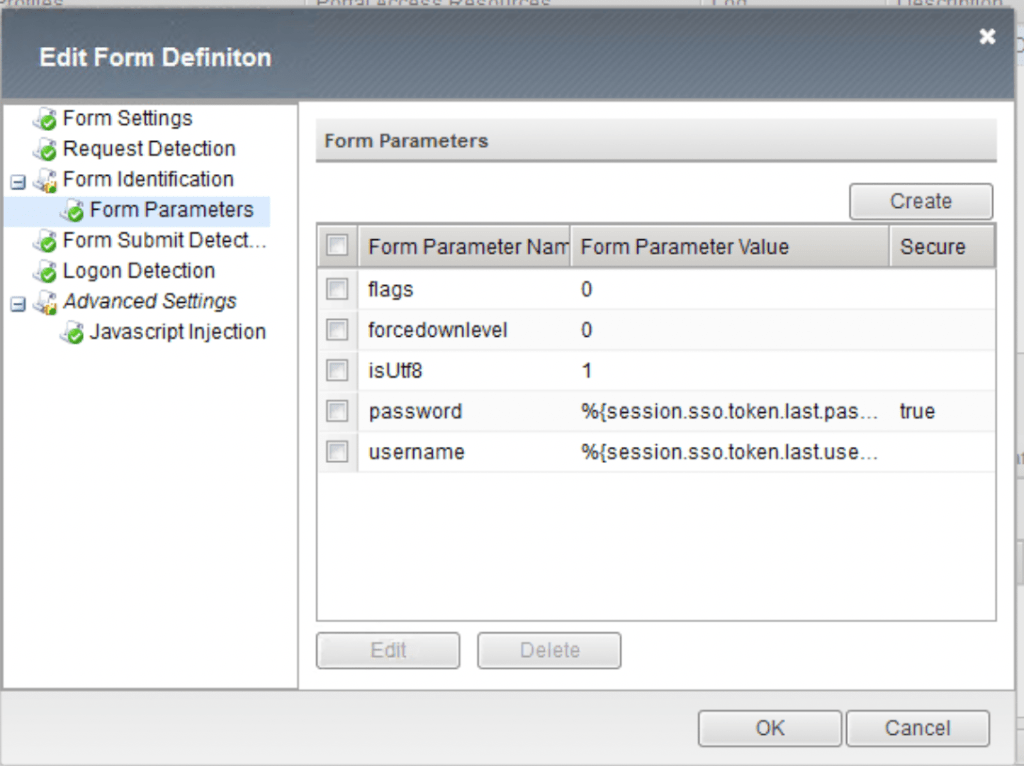
Our first option in my opinion is the best one. Nearly every networking vendor these days provides a secure access control mechanism, Cisco has Identity Service Engine, Aruba uses ClearPass, Palo Alto uses Panorama, the list goes on for miles. Because these native tools integrate directly with access control for your networking appliances it can be an extremely quick win to apply SSO via Azure AD and MFA via Conditional Access. You can then combine this with services like Privileged Identity Management (PIM) to manage access through approval flows and group claims. Each of your networking vendors will provide documentation for this:

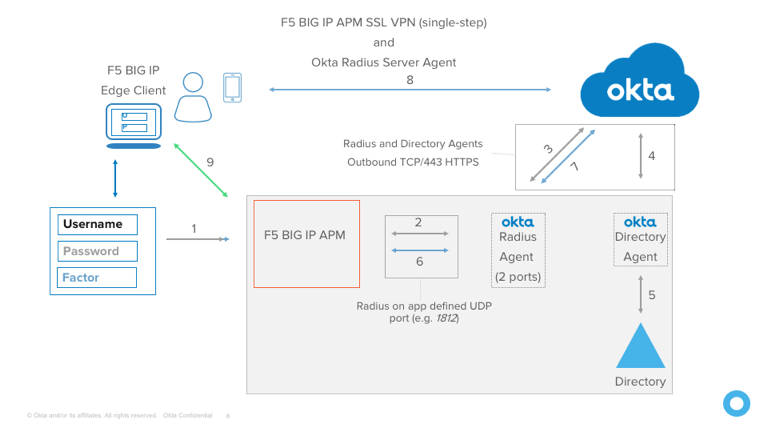
The second option works in privileged access scenarios where you don’t have a centralised identity service. Provided you can use the correct radius protocols, admins can configure the Azure MFA extension for NPS, with radius integration enabling MFA for your networking kit! In the below example, I use this to apply MFA to a SSH management interface for a Palo Alto firewall.

Managing Privileged Access for SSH using Radius and the MFA Extension

Up Next

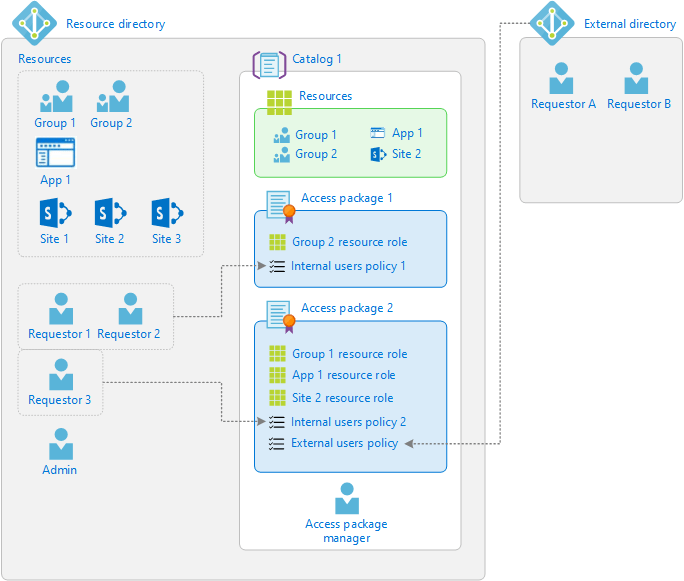
Using the above three techniques, you very quickly end up with a potential architecture that might look like this.

Thanks for sticking with me through this weeks guidance on Hybrid Scenarios If you’re after some more Privileged Access information, have a read of my AAD Basics guidance, or stay tuned for more info on what can be done using Azure AD, including some tips and techniques to help you stay in control. Topics this series is covering are:

  1. Strategy & Planning
  2. Azure AD Basics
  3. Hybrid Scenarios (This Post)
  4. Zero Trust
  5. Protecting Identity
  6. Staying in Control

Until next time, stay cloudy!

Originally Posted on arinco.com.au

Securing Privileged Access with Azure AD (Part 2) – The AAD Basics

Welcome back to my series on securing privileged access. In this post, I’m going to walk you through five basic concepts which will allow you to keep your identity secure when using Azure AD. If you missed part one on building your PAM strategy, head over here to learn about the rationale and mentality behind securing privileged access and why it should be part of your cybersecurity strategy.

1. Azure AD Groups

This might seem a bit simple, but if you’re not using group assignments wherever possible, you’re doing something wrong. Assigning applications, roles, resources and service ownership to a group makes everything easier when building a privileged access deployment. If you’re starting out, this is fairly easy to implement. If you’re already using Azure AD, an afternoon is all you need to convert the majority of role assignments to groups for Azure AD (Your Milage May Vary for Azure IAM!).

When Assigning, develop role and access groups with the following mantra in your mind

Mutually Exclusive, Collectively Exhaustive. (MECE)

This mantra will help you to nest groups together, in a fashion that ensures your administrators have access to all the services they need. Take a help desk admin as an example. Assign a group to Helpdesk Administrator, Global Reader and Teams Communications Support Engineer. Nest the “Helpdesk Admin Users” within each . As separate access assignments, these access groups are mutually exclusive. Once nested to a group, these become collectively exhaustive. As an added benefit, applying the above MECE process to role group assignment will make some Identity Governance activities like Segregation of Duty easier!

Make the new group eligible for privileged access assignment
Assigning Privileged Access to Azure AD Groups requires you to enable role assignment on creation

Pro Tip: Dynamic Groups are a great way to grant low privileged access to business services and minimise operational overhead. However, you need to be aware of lateral movement paths – If users can edit the attribute which the dynamic access is tied to, that is a method which may allow users to bypass your identity design.

2. Conditional Access (CA)

Easily the most effective identity security control for organisations to implement is Multi Factor Authentication. Microsoft has made no secret of its opinion with regard to MFA, even touting that MFA prevents 99.9% of identity based attacks.

In it’s most simple form, a Conditional access rule applies a set of logic to each sign-in which occurs against Azure AD. Combine conditional access with ubiquitous integration to Azure AD and you can secure a large number of applications with a single control.

Conceptual Conditional Access process flow
Conditional Access is a great solution for securing Privileged Access

If you’re wanting the fastest conditional access setup ever, apply the Multi-Factor Authentication sign in control to All Users, for All Applications on every sign-in.

While this would technically work, I wouldn’t recommend this approach and the reason is simple – It degrades trust in your MFA setup. As security practitioners, we know that our users will slowly grow accustomed to an enforced behaviour. If you setup Conditional access to prompt for MFA frequently without a clear scenario, you will very quickly find that MFA is almost useless, as users select accept for every MFA prompt they see without thought or consideration. If you don’t have time to configure Conditional Access, enable the Azure AD Secure Defaults.

A better approach to Conditional Access is to define your scenarios. In the case of Privileged Access, you have a few critical scenarios where Conditional Access configurations should be applied. These are:

  1. MFA Registration from outside your operating country. Block this. Hackers shouldn’t be able to enroll MFA tokens for breached accounts.
  2. Login for Azure, Azure AD and integrated SaaS admin accounts. Require MFA and secure endpoints for all sessions.
  3. High risk logins. Block all or most of these events. Require a password reset by another administrator.

3. Split administrative accounts

For the security aficionados reading this post, the “minimal blast radius” concept should be quite familiar. For those of you newer to security, this concept focuses on the idea that one small breach should be isolated by default and not cause one big breach.

The easiest way to do this for Privileged Access is to split up your key administrator accounts. One admin for Azure AD, one admin for Active Directory and one admin for your external SaaS applications. A prominent example of this control not being applied recently, was the Solorigate attacks against Solarwinds customers. In this attack chain, an on-premise breach was used to compromise cloud administrator accounts using forged ADFS tokens. With segregated admin accounts, this attack would have been reduced in impact – You can’t log into a cloud only global admin account with an ADFS token.

Microsoft recommends you separate admin accounts in hybrid environments

If you’re on the fence about this control because it may seem inconvenient for day to day operations, consider the following.

Good identity controls are automatic

As you spend more time investing into advanced identity capability, you will notice that operational overhead for identity should decrease. It might start out challenging, but over time you will rely less on highly privileged roles such as global administrator.

4. Configure and monitor break glass accounts

Setting up Privileged Access management is an important process, and perhaps one of the most critical step within this process is to have a plan for when things go wrong. It’s ok to admit it. Everyone makes mistakes. Services have outages or sometimes you just click the wrong button. A break glass account is your magical get out of jail card for these exact scenarios. If you don’t spend two minutes to set these up, you will definitely curse when you find them missing.

There is a couple things you should keep in mind when creating break glass accounts. Firstly, how will this access be stored and secured? Organisations may opt to vault credentials in a password manager, print passwords for physical storage in a safe, or have two “keepers” who each retain half of the password (nuclear launch code style). In my opinion, the best action for break glass credentials is to go password less. Spend the money and get yourself a FIDO2 compliant hardware key such as those from Yubico or Feitian. Store this hardware key somewhere safe and you’re home free – NO password management overhead and hyper secure sign in for these accounts.

The second thing to keep in mind for break glass accounts is: They should NOT be used. As these accounts are generic, tied to the business and not a user, there isn’t always a method to attribute actions that a break glass account takes to a specific employee. This is a challenge for insider threat scenarios. If all your administrators have access to the account, how are you to know who intentionally deleted all your files with the account when they had really bad day?

Securely storing credentials for a break glass account is the first method which you prevent this happening, but the second is to alert on usage. If your business process somehow fails and the credentials leak, you have a rapid prompt by which lets you know something may be going wrong.

5. Privileged Identity Management

Azure AD Privileged Identity Management, PIM for short, focuses on applying approved administrative access within a time-boxed period. This works by automatically removing administrative access when not required, and requiring approval with strong authentication to re-activate the access. You can’t abuse an administrator account that has no admin privileges.

The PIM Process. Source: Robert Przybylski

Good PIM implementations are generally backed by strong business process. At the end of the day, identity is a people centric technology. Sometimes real world process needs to be considered. The following tips should help you design a decent PIM implementation, keeping in mind your key stakeholders.

  • Be pragmatic about Eligible vs Permanently assigned roles. Your corporate risk profile may allow some roles to be active all the time.
  • Have multiple approvers for each role. What if someone has a day off? You don’t want to block the business because you haven’t got an approver available.
  • Consider the time it takes you to execute a common task. If Admins have tasks which take two hours, but need to re-activate a role every hour, you’re simply adding frustration to peoples days.
  • Build a data driven review process. PIM provides rich reporting on usage and activation of roles, so use this to remove or grant further access at a periodic interval.

Finally, Notice how the last item in this list is the only one that explicitly mentions privileged access in the name? This is because PIM provides the best benefit when used within a healthy and well-managed environment. In my opinion, taking the time to use your Azure AD P1 Features before paying extra for an Azure AD P2 feature is the best approach. Consider the Microsoft guidance and your own strategy before making that decision however.

Up Next

Thanks for sticking with me through this weeks guidance on Azure AD Basics If you’re after some more Privileged Access information, have a read of my strategy guidance, or stay tuned for more info on what can be done using Azure AD, including some tips and techniques to help you stay in control. Topics this series is covering are:

  1. Strategy & Planning
  2. Azure AD Basics (This Post)
  3. Hybrid Scenarios
  4. Zero Trust
  5. Protecting Identity
  6. Staying in Control

Until next time, stay cloudy!

Securing Privileged Access with Azure AD (Part 1) – Strategy and Planning

I’ve been approached a few times recently on how best to govern and secure Privileged Access using the Microsoft stack. Often this conversation is with organizations who don’t have the need, budget or skillset to deploy a dedicated solution such as those from CyberArk, BeyondTrust or Thycotic. Understanding this, these organizations are looking to uplift security, but are pragmatic about doing it within the ecosystem they know and can manage. This series will focus on getting the most of out Azure AD, challenging your thinking on Azure AD capabilities and using the Microsoft ecosystem to extend into hybrid environments!

What is Privileged Access?

Before we dive too deep into the topic, it’s important to understand what exactly is privileged access? Personally, I believe that a lot of organizations look at this in the wrong light. The simplest way to expand your understanding is by asking two questions.

  1. If someone unauthorized to see or use my solution/data had the ability to do so, would the impact to my business be negative?
  2. If the above occurred, how bad would it be?

The first question really focuses on the core of privileged access – It is a special right you grant your employees and partners, with the implicit trust it won’t be abused in a negative way. Using this question is good because it doesn’t just focus on administrative access – A pitfall which many organizations fall into. It also brings specialized access into scope. Question two is all about prioritizing the risk associated with each of your solutions – Understanding that intentional leakage of the organizational crown jewels is more important than someone who can access a server will often allow you to be pragmatic with your focus in the early stages of your journey.

Access diagram showing the split between privileged and user access.
This Microsoft visual shows how user access & privileged access often overlap.

Building a Strategy

Understanding your strategy for securing privileged access is a critical task and it should most definitely be distinct from any planning activities. Privileged access strategy is all about defining where to exert your effort over the course of your program. Having a short term work effort, aligned to a long term light on the hill ensures that your PAM project doesn’t revisit covered ground.

To do this well, start by building an understanding of where your capabilities exist. Something as simple as location is adequate. For example, I might begin with; Azure Melbourne, Azure Sydney, Canberra datacenter and Unknown (SaaS & everything else).

From that initial understanding, you can begin to build out some detail, aligned to services or data. If you have a CASB service like Cloud App Security enabled, this can be really good tool to gain insights on what is used within in your environment. Following this approach, our location based data suddenly expands to; Azure IaaS/PaaS resources, Azure Control Plane, SaaS application X, Data Platform (Storage Accounts) and Palo Alto Firewalls.

This list of services & data can then be used to build a list of access which users have against each service. For IaaS/PaaS and SaaS app X, we have standard users and administrators. ARM and Data platform overlaps for admin access, but data platform also has user access. Our networking admins have access to the Palo Alto devices, but this service is transparent to our users.

Finally, build a matrix of impact, using risks to the identity & likelihood of occurrence. Use this data to prioritize where you will exert your effort. For example; A breach of my SaaS administrator account for a region isn’t too dangerous, because I’ve applied a zero trust network architecture. You cannot access customer data or another region from the service in question. I’ll move that access down in my strategy. My users with access to extremely business sensitive data commonly click phishing emails. I’ll move that access up in my strategy.

How to gauge impact easily – Which version of the CEO would you be seeing, if this control of this privileged access was lost?
Source: Twitter

This exercise is really important, because we have begun to build our understanding of where the value is. Based on this, a short PAM strategy could be summarized into something like so;

  1. Apply standard controls for all privileged users, decreasing the risk of account breach.
  2. Manage administrative Accounts controlling identity, ensuring that access is appropriate, time bound and audited.
  3. Manage user accounts with access to key data, ensuring that key access is appropriate, reviewed regularly and monitored for misuse.
  4. Manage administrative Accounts controlling infrastructure with key data.
  5. Apply advanced controls to all privileged users, enhancing the business process aligned to this access.
  6. Manage administrative accounts with access to isolated company data (no access from service to services).

My overarching light on the hill for all of this could be summarized as: “Secure my assets, with a focus on business critical data enhancing the security of ALL assets in my organization”

Planning your Solutions

After you have developed your strategy, it’s important to build a plan on how to implement each strategic goal. This is really focused on each building block you want to apply and the technology choices you are going to make. Notice how the above strategy did not focus on how we were going to achieve each item. My favourite bit about this process is; Everything overlaps! Developing good controls in one area, will help secure another area, because identity controls generally cover all the user base!

The easiest way to plan solutions is to build out a controls matrix for each strategic goal. As an example,

Apply Standard Controls for all privileged users

Could very quickly be mapped out to the following basic controls:

Solution ControlPurpose
Conditional AccessMulti-Factor AuthenticationWorks to prevent password spray, brute force and phishing attacks. High quality MFA design combined with attentive users can prevent 99.9% of identity based attacks.
Conditional AccessSign In Geo BlockingAdministration should be completed only from our home country. Force this behaviour by blocking access from other locations.
Azure AD Password ProtectionPassword PolicyWhile we hope that our administrators don’t use Summer2021 as a password, We can sleep easy knowing this will be prevented by a technical control.

These control mappings can be as complex or as simple as needed. As a general recommendation, starting small will allow you to aggressively achieve high coverage early. From there you can re-cover the same area with deeper and advanced controls over time. Rinse and repeat this process for each of your strategic goals. You should quickly find that you have a solution for the entire strategy you developed!

Up Next

If you’ve stuck with me for this long, thank-you! Securing Privileged Access really is a critical process for any cyber security program . Hopefully you’re beginning to see some value in really expanding out a strategy and planning phase for your next privileged access management project. Over the next few posts, I’ll elaborate on what can be done using Azure AD, and some tips and techniques to help you stay in control. Topics we will cover are:

  1. Strategy & Planning (This Post)
  2. Azure AD Basics
  3. Hybrid Scenarios
  4. Zero Trust
  5. Protecting Identity
  6. Staying in Control

Until next time, stay cloudy!

Originally Posted on arinco.com.au

A first look at Decentralised Identity

As an identity geek, something I’ve always struggled with has been user control and experience. Modern federation (such as OIDC/SAML) allows for generally coherent experiences, but it relies on user interaction with a central platform, removing control. Think of how many services you log into via your Facebook account. If Facebook was to go down, are you stuck? The same problem exists (albeit differently) with your corporate credentials.

Aside from centralisation, ask yourself, do you have a decent understanding of where your social media data is being shared? For most, I would guess the answer is no. Sure you can go and get this information, but that doesn’t show you who else has access to it. You own your identity and the associated data, but you don’t always control its use.

Finally, how many of your credentials cross that bridge into the real world? I would posit that not many do. If they are, it’s likely some form of app or website.

Enter Decentralised Identity

Thankfully, with these challenges in mind, the Decentralised Identity Foundation (DIF) has set to work. As a group, the foundation is working to develop an open, standards based ecosystem for scalable sharing and verification of identity data. At its core, the DIF has developed standards for Decentralised Identifiers (DIDs) as a solution, with varying secondary items under differing working groups. So, how does Decentralised Identity work?

In short, it uses cryptographic protocols and blockchain ledgers to enable verifiers that validate a user claim without talking to the original issuer. The owner of each claim holds full possession of the data, and presentation of the data in question requires the owners consent.

Explaining Decentralised Credentials. 
Source:
https://sovrin.org/wp-content/uploads/2018/03/Sovrin-Protocol-and-Token-White-Paper.pdf
DID High level summary

In English Please?

A few excellent real world examples exist for where this Decentralised Identity could easily be applied. Say you (the owner) are an accredited accountant with Contoso Financial Advisors (the issuer). As a member, you are provided a paper based certificate of accreditation. On a job application, you provide this paper based record to a prospective employer (the verifier).

From here, your employer has a few options to validate your accreditation.

  • You have the “accredited” paper, so you must be legit right? Without verification of your accreditation, the work you put into obtaining it is invalidated.
  • Look for security features in your accreditation. This is vulnerable to fraud, with some documents not containing these features.
  • They can contact Contoso to check the validity of your accreditation.This relies on Contoso actually having a service to validate credentials while still operating.

As you provide this accreditation to the employer, you also have a few concerns about the data contained within. What if they take a copy of this accreditation for another purpose? What if they also sell this information?

Combined, the current options for validation of identity ensure that;

  • Any presented data is devalued, through either lack of verification or fraud,
  • Data control is given away without recourse,
  • A reliance is built on organisations to be permanently contactable.

DID’s work to solve these challenges in a few ways. A credential issued within the DID ecosystem is signed by both the Issuer and the owner. As this signature information is shared in a secure, public location anyone can complete a verification activity with a high degree of confidence. As only the verification data is held publicly, you (the owner) can provide data securely, with the verifier unable to pass this information onto third parties with an authentic signature.

Finally, if Contoso was to close down or be uncontactable, the use of a decentralised leger allows your employer to verify that you are who you say you are. The ledger itself has the added benefit of not requiring ongoing communication with Contoso, meaning they also benefit as they no longer have to validate requests from third parties.

Azure AD Verifiable Credentials

As a new technology, I was quite enthused to see Microsoft as member level contributor to the standards and working groups of the DIF. I was even more excited to see Microsofts DID implementation “Azure AD Verifiable credentials” announced into public preview. Although it is still a new service and the documentation is light on, I’ve been able to tinker with the Microsoft example codebase and have found the experience to be pretty slick.

To get started yourself, pull down the code from GitHub and step through the documentation snippets. Pretty quickly, you should have a service available using ngrok and a verifiable credential issued to your device. Look at me mum, I’m a verified credential expert!

Verifiable Credentials Expert Card

Using the example codebase, you should note that the credential issuance relies on a Microsoft managed B2C tenant. The first step for anyone considering this technology is to plumb the solution into your own AAD.

To do so, you first need to create an Azure Key Vault resource as the Microsoft VC service stores the keys used to sign each DID. When provisioning, make sure you have key create, delete and sign permissions for your account. Without this, VC activation will fail.

Next, you need to navigate through to Azure AD, then enable VC under: Security> Verifiable Credentials (Preview).

Verifiable Credentials Enablement screen

Take note, if you plan to verify your domain it must be available over https and not utilise redirects. This held up my testing as my container hit the lets-encrypt provisioning limits.

Once you have enabled your environment, you need to create a rules and a display file before activating a new credential type. These files define what your credential looks like and what must be completed to obtain one. I created a simple corporate theme matching the Arinco environment, plus a requirement to log into Azure AD. Each rule is defined within an attestations block, with the mapping for my id token copying through to attributes held by the VC. One really nice thing when testing out basic capability is that you can create an attestation which takes only user input, meaning no configuration of an external IDP or consumption of other VC is required.


My Rules File

{
  "attestations": {
    "idTokens": [
      {
        "mapping": {
          "firstName": { "claim": "given_name" },
          "lastName": { "claim": "family_name" }
        },
        "configuration": "https://login.microsoftonline.com/<MY Tenant ID>/v2.0/.well-known/openid-configuration",
        "client_id": "<MY CLIENT ID>",
        "redirect_uri": "vcclient://openid/",
        "scope": "openid profile"
      }
    ]
  },
  "validityInterval": 2592000,
  "vc": {
    "type": ["ArincoTestVC"]
  }
}


My Display File

{
  "default": {
    "locale": "en-US",
    "card": {
      "title": "Verified Employee",
      "issuedBy": " ",
      "backgroundColor": "#001A31",
      "textColor": "#FFFFFF",
      "logo": {
        "uri": "https://somestorageaccount.blob.core.windows.net/aad-vc-logos/Logo-SymbolAndText-WhiteOnTransparent-Small.png",
        "description": "Arinco Australia Logo"
      },
      "description": "This employee card is issued to employees and directors of Arinco Australia"
    },
    "consent": {
      "title": "Do you want to get your digital employee card from Arinco Demo?",
      "instructions": "Please log in with your Arinco Demo account to receive your employee card."
    },
    "claims": {
      "vc.credentialSubject.firstName": {
        "type": "String",
        "label": "First name"
      },
      "vc.credentialSubject.lastName": {
        "type": "String",
        "label": "Last name"
      }
    }
  }
}

Once you have created your files, select create new under the credentials tab within Azure AD. The process here is pretty straight forward, with a few file uploads and some next-next type clicking!

Verifiable Credentials Provisioning Screen

Once uploaded to Azure AD, you’re ready to build out your custom website and test VC out! The easiest way to do this is to follow the Microsoft documentation, updating the provided sample, testing functionality and then rebranding the page to suit your needs. With a bit of love, you end up with a nice site like below.

And all going well, you should be able to create your second verifiable credential.

Two Verified Credentials Cards

The overall experience?

As verifiable credentials is a preview service, there’s always going to be a bit of risk associated with deployment. That being said, I found the experience to be straight forward with only a few teething issues.

One challenge I would articulate for others is while provisioning https certificates do not configure DNS for your DID well known domain. This causes authenticator to attempt to connect over https with the user experience slowed by about two to three minutes of spinning progress wheels while the application completes retries.

As for new capability, I’m really looking forward to seeing where the service goes with my primary wish list as follows:

  1. Some form of secondary provisioning aside from QR Codes. I personally don’t enjoy QR due to a leftover distaste from COVID-19 contact tracing in Australia. A way to distribute magic links for provisioning, or silent admin led provisioning, would be really appreciated.
  2. Any form of NFC support. To me, this is the final frontier to cross for digital/real world identity. Imagine if we could use VC for services such as access to buildings, local shops or even public transport.

Hopefully, you have found this article informative. Until next time, stay cloudy!

Integrating Kubernetes with Okta for user RBAC.

Recently I built a local Kubernetes cluster – for fun and learning. As an identity geek, the first thing I assess when building any service, is “How will I log in?” Sure I can use local Kubernetes service accounts, but where is the fun in that? Getting started with my research, I found a couple of really great articles documents and I would be amiss If I didn’t start by sharing these;

I don’t think it needs acknowledgement, but the K8s ecosystem is diverse, and the documentation can be daunting at the best of times. This post is slightly tuned to my setup, so you may need to tinker a bit as you get things working on your own cluster. I’m using the following for those who would like to follow along at home;

  • A MicroK8s based Kubernetes cluster (See here for quick setup on raspberry pi’s)
  • An Okta Developer tenant (Signup here – Free for the first 5 apps)

Initial Okta Configuration

To configure this integration for any identity provider, we will need a client application; First up – create an OIDC application using the app integration wizard. You will want a “web application” with a login URL that looks something like so

https://localhost:8000

Pretty straight forward stuff, customise the name/logo as you like. Once you pass the initial screen, note down your client ID & secret for use later. Kubernetes services often are able to refresh OIDC tokens for you; to support this, you will need to modify the allowed grant types to include Refresh – A simple checkbox under the application options.

Finally, assign some users to your application. After all, it’s great to be able to login with OIDC tokens, but if Okta won’t assign them in the first place, why bother? 😀

Modifying the Kubernetes API Server

Once you’ve completed your Okta setup, it’s time to move to Kubernetes. There is a few configuration flags needed to configure the kube-apiserver, but only two are hard requirements. The others will make things easier to manage in the long run;

--oidc-issuer-url=https://dev-987710.okta.com/oauth2/default #Required
--oidc-client-id=00a1g3wxh9x9KLciv4x9 #Required
--oidc-username-prefix=oidc: #Recommended - Makes things a bit neater for RBAC
--oidc-groups-prefix=oidcgroup: #Recommended

Apply these to your api config. If you’re using kops, simply add the changes using kops edit cluster. In my case, I’m using microk8s, so I edit the apiserver configuration located at:

/var/snap/microk8s/current/args/kube-apiserver

and then apply this with:

microk8s stop; microk8s start

Testing Login

At this point we can actually test our sign-in, albeit with limited functionality. To do this, we need to grab an ID token from Okta API using curl or postman. This is a three step process.

1. Establish a session using the Sessions API

curl --location --request POST 'https://dev-987710.okta.com/api/v1/authn' \
--header 'Accept: application/json' \
--header 'Content-Type: application/json'\
--data-raw '{
"username": "kubernetesuser@westall.co",
"password": "supersecurepassword",
"options": {
"multiOptionalFactorEnroll": true,
"warnBeforePasswordExpired": true
} 
}'

2. Exchange your session token for an auth code

curl --location --request GET 'https://dev-987710.okta.com/oauth2/v1/authorize?client_id=00a1g3wxh9x9KLciv4x9&response_type=code&response_mode=form_post&scope=openid%20profile%20offline_access&redirect_uri=http%3A%2F%2Flocalhost%3A8000&state=demo&nonce=b14c6ea9-4975-4dff-9cf6-1b475045dffa&sessionToken=<SESSION TOKEN FROM STEP 1>'

3. Exchange your auth code for an access & id token

curl --location --request POST 'https://dev-987710.okta.com/oauth2/v1/token' \
--header 'Accept: application/json' \
--header 'Authorization: Basic <Base64 Encoded clientId:clientSecret>=' \
--header 'Content-Type: application/x-www-form-urlencoded' \
--data-urlencode 'grant_type=authorization_code' \
--data-urlencode 'redirect_uri=http://localhost:8000' \
--data-urlencode 'code=<AUTH CODE FROM STEP 2>'

One we have collected a valid ID token, we can run any command against the kubernetes API using the –token & server flag.

kubectl get pods -A --token=<superlongJWT> --server='https://192.168.1.20:16443'

Don’t stress if you get an “Error from server (Forbidden)” prompt back from your request. Kubernetes has a deny by default RBAC design that means nothing will work until a permission is configured.

If you are like me and are also using Microk8s, you should only get this error if you have already enabled the RBAC add on. By default, Microk8s runs with the api server flag: –authorization-mode=AlwaysAllow . This means that any authenticated user should be able to run kubectl commands. If you want to enable fine grained RBAC, the command you need is:

microk8s enable rbac

Applying access control

To make our kubectl commands work, we need to apply a cluster permission. But before I dive into that, I want to point out something that is a bit yucky. Note that for each command, my user is prefixed as configured, but the identifier presented is the users unique Okta profile ID.

While this will work when I assign access, it’s definitely hard to read. To fix this, I’m going to add another flag to my kube-api config.

--oidc-username-claim=preferred_username

Now that we have applied this, you can see that I’m getting a slightly better experience – My users are actually identified by a username! It’s important for later to understand that this claim is not provided by default. In my original authorization request I ask for the “profile” scope in ADDITION to the openid scope.

From here, we can begin to apply manifests against each user for access (using an authorized account). I’ve taken the easy route and assigned a clusterAdmin role here:

kubectl apply -f - <<EOF
kind: ClusterRoleBinding
apiVersion: rbac.authorization.k8s.io/v1
metadata:
  name: oidc-admin-binding
roleRef:
  apiGroup: rbac.authorization.k8s.io
  kind: ClusterRole
  name: cluster-admin
subjects:
- kind: User
  name: oidc:Okta-Lab@westall.co
EOF

At this point you should be able to test again and get your pods with an OIDC token!

Tidying up the login flow

Now that we have a working kubectl client, I think most people would agree that 3 Curl requests and a really long kubectl command is a bit arduous. One option to simplify this process is to use the native kubectl support for oidc within your kubeconfig.

Personally, I prefer to use the kubectl extension kubelogin. The benefit of using this extension is it simplifies the login process for multiple accounts and your kubeconfig contains arguably less valuable data. To enable kubelogin, first install it;

# Homebrew (macOS and Linux)
brew install int128/kubelogin/kubelogin

# Krew (macOS, Linux, Windows and ARM)
kubectl krew install oidc-login

# Chocolatey (Windows)
choco install kubelogin

Next update your kubeconfig with an OIDC user like so. Note the use of the –oidc-extra-scope flag. Without this Okta will return a token without your preferred_username claim, and signin will fail!

- name: okta
  user:
    exec:
      apiVersion: client.authentication.k8s.io/v1beta1
      args:
      - oidc-login
      - get-token
      - --oidc-issuer-url=https://dev-987710.okta.com
      - --oidc-client-id=00a1g3wxh9x9KLciv4x9
      - --oidc-client-secret=<okta client secret>
      - --oidc-extra-scope=profile
      - -v1 #Not required, useful to see the process however
      command: kubectl
      env: null

Finally, configure a a new context with your user and run a command. Kubelogin should take care of the rest.

In my opinion, for any solution you deploy, personal or professional. Identity should always be something you properly implement. I’ve been lucky to have most of the K8s magic abstracted away from me (Thanks Azure) and I found this process immensely informative and a useful exercise. Hopefully you will find this post useful in your own identity journey 🙂 Until next time, stay cloudy!

Azure AD Application Policies Simplified

One of the most common arguments I hear when discussing the move to Azure AD is: “ADFS lets me control everything”. For change adverse organisations, this can be a legitimate problem. More often than not however, the challenge is not that Azure AD cannot be customised to the organisational need. Instead, it is that operators don’t understand how to customise Azure AD. When considering ADFS, the following areas are commonly updated to match business requirements

  • Branding
  • Claims Policy
  • Home Realm Discovery
  • Token Lifespans

Branding is a pretty common requirement and can be modified in two ways, depending if you’re focused on business or consumer identity. Claims Policy, HRD and Token lifespans are all a bit more confusing, with policy for these being the topic of todays post.

Policy Types

If you pop the hood on Azure AD using Graph, you will discover quickly that application policies are derived from the “stsPolicy” resource. This ensures that nearly every policy follows a standard format, with the key difference occurring within the definition element. Generally speaking, If you’ve written one policy type, you can write them all. Application Policies can be applied against both the Application and the application Service Principal, meaning rather than the two types that are immediately indicated in the Application documentation, we actually have five types. If you’re not aware of how Azure AD Applications and Service Principals work together, Microsoft provides a good summary here.

Policy TypeUsage ScenarioADFS Equivalent
HomeRealmDiscovery“Fast Forwarding” directly from Azure AD to a branded sign-in page or external IDP. Useful in migration scenarios. Home Realm Discovery
ClaimsMappingPolicyMapping data that is not supported by “Optional Claims” into SAML, ID and Access tokens. Claim Rules
PermissionGrantPolicyBypass admin approval flows when users request specific permissions. EG Graph/User.ReadN/A
TokenIssuancePolicyUpdate Characteristics of SAML tokens – Things like token signing or SAML Version. WS-Fed and custom certificates
TokenLifetimePolocyExtend or modify how long SAML, or ID tokens are valid for. Relying Party Token Lifetimes

Unfortunately documentation on application policies is currently a little light on content, and there is a few important details you must understand when applying them;

  1. As of writing, some policy types are in preview, meaning that Microsoft reserves the right to change how they work.
  2. ClaimsMappingPolicies require you to set the “acceptMappedClaims” value to true within the application manifest OR configure a custom signing key.
  3. TokenLifeTimePolicy works only for ID and Access tokens as of January 31st 2021. Refresh and session tokens have moved to Conditional Access session control.

Reading Policy Objects

Thankfully the current specifications for policy objects are quite simple. In the below example we declare a ClaimsMappingPolicy which maps employeeid data from the Azure AD User through to SAML and ID Tokens.

{
    "ClaimsMappingPolicy": {
        "Version": 1,
        "IncludeBasicClaimSet": "true",
        "ClaimsSchema": [
            {
                "Source": "user",
                "ID": "employeeid",
                "SamlClaimType": "http://schemas.xmlsoap.org/ws/2005/05/identity/claims/employeeid",
                "JwtClaimType": "employeeid"
            }
        ]
    }
}

One principal to apply when building policies is to ensure they remain granular. This makes the effect of a policy clear and also enables you to assign one policy to many applications.

Applying Policy

Applying a policy to an application is currently not supported within the Azure AD portal, requiring you to use PowerShell and the AzureADPreview module. This is a pretty simple five step process.

1. Import the AzureADPreview Module and sign in to Azure
2. Create your application, either in the portal or using PowerShell
3. Create your application policy using PowerShell

#Create Policy Object
New-AzureADPolicy -Definition @('{"ClaimsMappingPolicy":{"Version":1,"IncludeBasicClaimSet":"true", "ClaimsSchema": [{"Source": "user","ID":"employeeid","SamlClaimType":"http://schemas.xmlsoap.org/ws/2005/05/identity/claims/employeeid","JwtClaimType":"employeeid"}]}}oli') -DisplayName EmitEmployeeIdClaim -Type ClaimsMappingPolicy

4. Assign your policy to your application

#Apply Policy to targeted application.
Add-AzureADServicePrincipalPolicy -Id <ServicePrincipalOBJECTId> -RefObjectId <PolicyId>

5. Validate your policy assignment

Get-AzureADServicePrincipalPolicy -Id <ServicePrincipalOBJECTId>
Policy Assignment Process

Hopefully you have found this post informative, with a few of your policy options de-mystified. As always, feel free to each out if you have any questions regarding your own Identity and Access Management scenarios.

Effortless sync for Azure AD B2B users within AD Connect

Recently I have been working on a few identity projects where Azure AD B2B users have been a focus point. The majority of organisations have always had a solution or process for onboarding contractors and partners. More often then not, this is simply “Create an AD Account” and call it a day. But what about Azure AD? How do organisations enable trusted parties, without paying for it?

Using native “cloud only” B2B accounts lets organisations onboard contractors seamlessly, but what about scenarios where you want to control password policy? Or grant access to on-premise integrated solutions? In these scenarios, retaining the on-premise process can be a hard requirement. Most importantly, we need to solve all these questions without changes to existing business process

Thankfully, Microsoft has developed support for UserTypes within AD Connect. Using this functionality, administrators can configure inbound and outbound synchronisation within AD Connect, with the end result being on-premise AD mastered, guest accounts within Azure AD.

The Microsoft Process

Enabling this synchronisation according to the Microsoft documentation is a pretty straight-forward task;

  1. Disable synchronisation – You should complete this before carrying out any work on AD connect
  2. Designate and populate an attribute which will identify your partner accounts. “ExtensionAttributes” within AD are a prime target here.
  3. Using the AD Connect Sync manager, ensure that you are importing your selected attribute.
  4. Using the AD Connect Sync Manager, enable “userType” within the Azure AD schema
Add source attribute to Azure AD Connector schema
Enabling UserType within the AAD Schema

5. Create an import rule within the AD Connect rules editor, targeting your designated attribute. Use an expression rule like so to ensure the correct value is applied.

IIF(IsPresent([userPrincipalName]),IIF(CBool(InStr(LCase([userPrincipalName]),"@partners.fabrikam123.org")=0),"Member","Guest"),Error("UserPrincipalName is not present to determine UserType"))

6. Create an export rule moving your new attribute from the metaverse through to Azure AD
7. Enable synchronisation and validate your results.

A Better Way to mark B2B accounts

While the above method will most definitely work, it has a couple of drawbacks. Firstly, it relies on data entry. If the designated attribute is not set correctly, your users will not update. If you haven’t already got this data, you also need to apply it. More work. Secondly, this process can be achieved through a single sync rule and basic directory management. Less locations for our configuration to break.

To apply this simpler configuration, you still complete Steps 1 and 4 from above. Next, you ensure that your users are properly organised into OU’s. For this example, I’m using a “Standard” and “Partner” OU structure.

Finally, you create a single rule outbound from the AD Connect metaverse to Azure AD. As with most outbound rules, ensure you have an appropriate scope. In the below example we want all users, who are NOT mastered by Azure AD.

The critical part of your rule is the transformations. Because DistinguishedName (CN + OU) is imported to AD Connect by default, our rule can quickly filter on the OU which holds our users.

IIF(IsPresent([distinguishedName]),IIF(CBool(InStr(LCase([distinguishedName]),"ou=users - partners,dc=ad,dc=westall,dc=co")=0),"Member","Guest"),Error("distinguishedName is not present to determine UserType"))

Our outbound transformation rule

And just like that, we have Azure AD Accounts, automatically marked as Guest Users!

Balon Greyjoy 
Barristan Selmy 
Benjen Stark 
Beric Dondarr.,. 
Bran Stark 
Brienne Of Tar... 
Brynden Tully 
BaIon.Greyjoy@lab.westall.co 
Barristan.selmy@lab.westall.co 
Benjen.stark@lab.westall.co 
Beric.Dondarrion@lab.westall.co 
Bran.Stark@lab.westall.co 
Brienneof.Tarth@lab.westall.co 
Brynden.Tully@lab.westall.co 
Guest 
Guest 
Member 
Guest 
Member 
Guest 
Guest

B2B and Member accounts copied from AD

Using Azure AD Access Packages in B2B scenarios

With the advent of modern collaboration platforms, users are no longer content to work within the organisational boundary. More and more organisations are being challenged to bring in external partners and users for projects and day to day operations. But how can we do this securely? How do IT managers minimise licensing costs? Most importantly, how can we empower the business to engage without IT? This problem is at the forefront of the thinking behind Azure AD Access Packages. An Azure solution enabling self service onboarding of partners, providers and collaborators at scale. Even better than that, this solution enables both internal and external onboarding. You can and should set this up internally, the less work that IT has to do managing access, the better right?

Before we dig too deep, I think a brief overview of how access packages are structured would be useful. On a hierarchy level, packages are placed into catalogs, which can be used to enable multiple packages for a team to use. Each package holds resources, and a policy defines the who and when of requesting access to these using the process. The below diagram from Microsoft neatly sums this up.

Entitlement management overview
Access Package Hierarchy

This all sounds great I hear you saying. So what does this look like? If you have an Office 365 account, you’re welcome to log in and look for yourself here, otherwise a screenshot will have to do.

External Access Package UI

To get started with this solution, you will need an Azure AD P2 licensed tenant. Most organisations will obtain P2 licences this through an M365 E5 subscription, however you can purchase these directly if have M365 E3 or lower and are looking to avoid some costs. You will need to have at-least a 1:1 license assignment for internal use cases, while external identity has recently moved to a “Monthly Active Users” licensing model. One P2 licence in your tenant will license the first 50 thousand external users for free!

Once you’ve enabled this, head on over to the “Identity Governance” blade within Azure AD. This area has a wealth of functionality that benefits nearly all organisations, so I would highly recommend investigating the other items available here. Select Access Packages to get started.

The UI itself for creating an access packages is quite simple, clicking create-new will walk you through a process of assigning applications, groups, teams & share-point sites.

Access Package creation UI

Unfortunately some services like Windows Virtual Desktop will not work with access packages, however this is a service limitation rather than an Azure AD limitation. Expect these challenges to be resolved over time.

At the time of writing, the AzureADPreview module does not support Access Packages. Microsoft Graph beta does however, and so, have an MS Graph based script!

While all this PowerShell might look a bit daunting, understand all that is being done is generating API request bodies and pushing that over 6 basic API calls;

  1. Retrieve information about our specified catalog (General)
  2. Create an Access Package
  3. Add each resource to our specified catalog
  4. Get each resource’s available roles
  5. Assign the resource & role to our Access Packages
  6. Create a Policy which enables assignment of our Access Package

Hopefully this article has provided you with a decent overview of Azure AD Access Packages. There are a lot of benefits when applying this in B2B scenarios, especially when it comes to automating user onboarding & access management. With big investments & changes from Microsoft occurring in this space, expect further growth & new features as the year comes to a close!

Please Note: While we do distribute an access package link within this blog, requests for access are not sent to an monitored email and will not be approved. If you would like to know more, please don’t hesitate reach out as we would be happy to help.

Azure AD Administrative Units – Preview!

Recently I was approached by a customer regarding a challenge they wanted to solve. How to delegate administrative control of a few users within Azure Active Directory to some lower level administrators? This is a common problem experienced by teams as they move to cloud based directories – a flat structure doesn’t really allow for delegation on business rules. Enter Azure AD Administrative Units; A preview feature enabling delegation & organisation of your cloud directory. For Active Directory Administrators, this will be a quite familiar experience to Organisational Units & delegating permissions. Okta also has a similar functionality, albeit implemented differently.

Active Directory Admins will immediately feel comfortable with Azure AD Admin Units

So when do you want to use this? Basically any time you find yourself wanting a hierarchical & structured directory. While still in preview, this feature will likely grow over time to support advanced RBAC controls and in the interim, this is quite an elegant way to delegate out directory access.

Setting up an Administrative Unit

Setting up an Administrative Unit is quite a simple task within the Azure Portal; Navigate to your Azure AD Portal & locate the option under Manage.

Select Add, and provide your required names & roles. Admin assignment is focused on user & group operations, as device administration has similar capability under custom intune roles and application administrators can be managed via specified roles.

You can also create administrative units using the Azure AD PowerShell Module; A simple one line command will do the trick!

New-AzureADAdministrativeUnit -Description "Admin Unit Blog Post" -DisplayName "Blog-Admin-Users"

User Management

Once you have created an administrative unit, you can begin to add users & groups. As this point in time, administrative units only support assignment manually, either one by one or via csv upload. The process itself is quite simple; Select Add user and click through everyone you would like to be included.

While this works quite easily for small setups, at scale you would likely find this to be a bit tedious. One way to work around this is to combine Dynamic Groups with your chosen PowerShell execution environment. For me, This is an Automation Account. First, configure a dynamic group which automatically drags in your desired users.

Next, execute the following PowerShell snippet. Note that I am using the Azure AD Preview module, as support is yet to move to the production module.

https://gist.github.com/jameswestall/832549f95ac7caac80a1f6c74fef1931.js

This can be configured on a schedule as frequently as you need this information to be accurate!

You will note here that one user gets neatly removed from the Administrative Unit – This is because the above PowerShell treats the dynamic group as an authoritative source for Admin Unit Membership. When dealing with assignment through user details (Lifecycle Management) I find that selecting authoritative sources reduces both work effort and confusion. Who wants to do manual management anyway? Should you really want to allow manual addition, simply remove the line marked to remove members!

Hopefully you find this post a useful insight to the usage of Administrative Units within your organisation. There a lot of useful scenarios where this can be leveraged and this feature should most definitely help you minimise administrative privilege in your environment (hooray!). As always, feel free to reach out with any questions or comments! Stay tuned for my next post, where I will be diving into Azure AD Access Packages 🙂

Thoughts from an F5 APM Multi Factor implementation

Recently I was asked to assist with implementation of MFA in a complex on-premises environment. Beyond the implementation of Okta, all infrastructure was on-premises and neatly presented to external consumers through an F5 APM/LTM solution. This post details my thoughts & lessons I learnt configuring RADIUS authentication for services behind and F5, utilising AAA Okta Radius servers.

Ideal Scenario?

Before I dive into my lessons learnt – I want to preface this article by saying there is a better way. There is almost always a better way to do something. In a perfect world, all services would support token based single sign on. When security of a service can’t be achieved by the best option, always look for the next best thing. Mature organisations excel at finding a balance between what is best, and what is achievable. In my scenario, the best case implementation would have been inline SSO with an external IdP . Under this model, Okta completes SAML authentication with the F5 platform and then the F5 creates and provides relevant assertions to on-premise services.

Unfortunately, the reality of most technology environments is that not everything is new and shiny. My internal applications did not support SAML and so here we are with the Okta Radius agent and a flow that looks something like below (replace step 9 with application auth).

Importantly, this is implementation is not inherently insecure or bad, however it does have a few more areas that could be better. Okta calls this out in the documentation for exactly this reason. Something important to understand is that radius secrets can be and are compromised, and it is relatively trivial to decrypt traffic once you have possession of a secret.

APM Policy

If you have a read of the Okta documentation on this topic. you will quickly be presented with an APM policy example.

You will note there is two Radius Auth blocks – These are intended to separate the login data verification – Radius Auth 1 is responsible for password authentication, and Auth 2 is responsible for verifying a provided token. If you’re using OTP only, you can get away with a simpler APM policy – Okta supports providing both password and an OTP inline and separate by a comma for verification.

Using this option, the policy can be simplified a small amount – Always opt to simplify policy; Less places for things to go wrong!

Inline SSO & Authentication

In a similar fashion to Okta, F5 APM provides administrators the ability to pass credentials through to downstream applications. This is extremely useful when dealing with legacy infrastructure, as credential mapping can be used to correctly authenticate a user against a service using the F5. The below diagram shows this using an initial login with RSA SecurID MFA.

For most of my integrations, I was required to use HTTP forms. When completing this authentication using the APM, having an understanding of exactly how the form is constructed is really critical. The below example is taken from a Exchange form – Leaving out the flags parameter originally left my login failing & me scratching my head.

An annoying detail about forms based inline authentication is that if you already have a session, the F5 will happily auto log back into the target service. This can be a confusing experience for most users as we generally expect to be logged out when we click that logout button. Thankfully, we can handle this conundrum neatly with an iRule.

iRule Policy application

For this implementation, I had a specific set of requirements on when APM policy should be applied to enforce MFA; not all services play nice with extra authentication. Using iRules on virtual services is a really elegant way in which we can control when and APM policy applies. On-Premise Exchange is something that lots of organisations struggle with securing – especially legacy ActiveSync. The below iRule modifies when policy is applied using uri contents & device type.

when HTTP_REQUEST {
    if { (([HTTP::header User-Agent] contains "iPhone") || ([HTTP::header User-Agent] contains "iPad")) && (([string tolower [HTTP::uri]] contains "activesync") || ([string tolower [HTTP::uri]] contains "/oab")) } {
        ACCESS::disable
    } elseif { ([string tolower [HTTP::uri]] contains "logoff") } {
        ACCESS::session remove
    } else {
        ACCESS::enable
        if { ([string tolower [HTTP::uri]] contains "/ecp") } {
            if { not (([string tolower [HTTP::uri]] contains "/ecp/?rfr=owa") || ([string tolower [HTTP::uri]] contains "/ecp/personalsettings/") || ([string tolower [HTTP::uri]] contains "/ecp/ruleseditor/") || ([string tolower [HTTP::uri]] contains "/ecp/organize/") || ([string tolower [HTTP::uri]] contains "/ecp/teammailbox/") || ([string tolower [HTTP::uri]] contains "/ecp/customize/") || ([string tolower [HTTP::uri]] contains "/ecp/troubleshooting/") || ([string tolower [HTTP::uri]] contains "/ecp/sms/") || ([string tolower [HTTP::uri]] contains "/ecp/security/") || ([string tolower [HTTP::uri]] contains "/ecp/extension/") || ([string tolower [HTTP::uri]] contains "/scripts/") || ([string tolower [HTTP::uri]] contains "/themes/") || ([string tolower [HTTP::uri]] contains "/fonts/") || ([string tolower [HTTP::uri]] contains "/ecp/error.aspx") || ([string tolower [HTTP::uri]] contains "/ecp/performance/") || ([string tolower [HTTP::uri]] contains "/ecp/ddi")) } {  
                HTTP::redirect "https://[HTTP::host]/owa"
            }
        }
    }
}

One thing to be aware of when implementing iRules like this is directory traversal – You really do need a concrete understanding of what paths are and are not allowed. If a determined adversary can authenticate against a desired URI, they should NOT be able to switch to an undesired URI. The above example is really great to show this – I want my users to access personal account ECP pages just fine – Remote administrative exchange access? Thats a big no-no and I redirect to an authorised endpoint.

Final Thoughts

Overall, the solution implemented here is quite elegant, considering the age of some infrastructure. I will always advocate for MFA enablement on a service – It prevents so many password based attacks and can really uplift the security of your users. While overall service uplift is always a better option to enable security, you should never discount small steps you can take using existing infrastructure. As always, leave a comment if you found this article useful!